Checkboxes and radio buttons are the extensively used UI component which are used to construct a web form. Radio buttons are best used when we have a list of two or more than two options, and the user must choose precisely one option.
In the previous tutorial, we explored how to work with Checkboxes and Select Dropdown using PHP.
Create Radio Buttons with HTML
Create a simple form with radio buttons and add some of Netflix’s popular series name as a radio buttons value.
<!doctype html>
<html>
<head>
  <meta charset="utf-8">
  <title>Radio Buttons in PHP</title>
</head>

<body>

  <div class="container mt-5">
    <form action="" method="post" class="mb-3">
      <label>
        <input type="radio" name="radio" value="Lock & Key">Lock & Key
      </label>
      <label>
        <input type="radio" name="radio" value="Umbrella Academy">Umbrella Academy
      </label>
      <label>
        <input type="radio" name="radio" value="Stranger Things">Stranger Things
      </label>
      <label>
        <input type="radio" name="radio" value="Ozark">Ozark
      </label>

      <input type="submit" name="submit" vlaue="Get Values">
    </form>
  </div>

</body>

</html>
Get Selected Value of a Radio Button in PHP
Use $_POST[] to get the value of the selected radio button. If the value is not chosen, we are showing a message to the user to choose the value from the group of radio buttons.
<form action="" method="post">
<label>
<input type="radio" name="radio" value="Lock & Key">Lock & Key
</label>
<label>
<input type="radio" name="radio" value="Umbrella Academy">Umbrella Academy
</label>
<label>
<input type="radio" name="radio" value="Stranger Things">Stranger Things
</label>
<label>
<input type="radio" name="radio" value="Ozark">Ozark
</label>
<input type="submit" name="submit" vlaue="Get Values">
</form>
<?php
if(isset($_POST['submit'])){
if(!empty($_POST['radio'])) {
echo ' ' . $_POST['radio'];
} else {
echo 'Please select the value.';
}
}
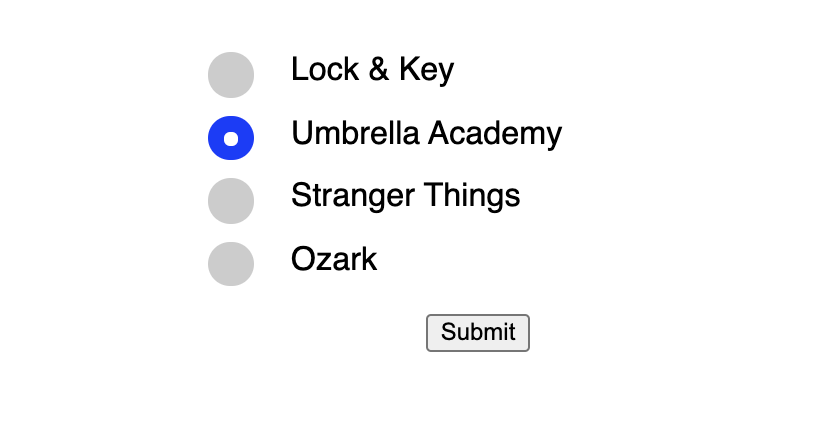
?>Customize Radio Buttons with CSS
The given below code creates the layout for customizing radio buttons with HTML.
<form action="" method="post">
    <label>
        <input type="radio" name="radio" value="Lock & Key">Lock & Key
        <span class="select"></span>
    </label>
    <label>
        <input type="radio" name="radio" value="Umbrella Academy">Umbrella Academy
        <span class="select"></span>
    </label>
    <label>
        <input type="radio" name="radio" value="Stranger Things">Stranger Things
        <span class="select"></span>
    </label>
    <label>
        <input type="radio" name="radio" value="Ozark">Ozark
        <span class="select"></span>
    </label>

    <input type="submit" name="submit" vlaue="Get Values">
</form>
Browser’s default style generates radio buttons default style, now following CSS overrides the browser’s default style and will give a new look to your radio buttons.
.container {
    max-width: 300px;
    margin: 50px auto;
    text-align: left;
    font-family: sans-serif;
}

select {
    width: 100%;
    min-height: 150px;
    margin-bottom: 20px;
}

input[type="submit"] {
    display: block;
    margin: 20px auto;
}

label {
    display: block;
    position: relative;
    cursor: pointer;
    font-size: 18px;
    padding-left: 46px;
    margin-bottom: 15px;
    -webkit-user-select: none;
    -moz-user-select: none;
    -ms-user-select: none;
    user-select: none;
}

label input {
    position: absolute;
    opacity: 0;
    cursor: pointer;
}

.select {
    top: 0;
    left: 0;
    height: 25px;
    width: 25px;
    position: absolute;
    border-radius: 50%;
    background-color: #cccccc;
}

label:hover input~.select {
    background-color: #ccc;
}

label input:checked~.select {
    background-color: #1A33FF;
}

.select:after {
    content: "";
    position: absolute;
    display: none;
}

label input:checked~.select:after {
    display: block;
}

label .select:after {
    top: 9px;
    left: 9px;
    width: 8px;
    height: 8px;
    border-radius: 50%;
    background: white;
}
There are other ways to add custom styling in Radio buttons, but we didn’t take the help of jQuery and created the custom radio button using only CSS.
Here is the final code for radio buttons in PHP with example.
<!doctype html>
<html>

<head>
  <meta charset="utf-8">
  <title>Radio Buttons in PHP</title>
  <style>
    .container {
      max-width: 300px;
      margin: 50px auto;
      text-align: left;
      font-family: sans-serif;
    }

    select {
      width: 100%;
      min-height: 150px;
      margin-bottom: 20px;
    }

    input[type="submit"] {
      display: block;
      margin: 20px auto;
    }

    label {
      display: block;
      position: relative;
      cursor: pointer;
      font-size: 18px;
      padding-left: 46px;
      margin-bottom: 15px;
      -webkit-user-select: none;
      -moz-user-select: none;
      -ms-user-select: none;
      user-select: none;
    }

    label input {
      position: absolute;
      opacity: 0;
      cursor: pointer;
    }

    .select {
      top: 0;
      left: 0;
      height: 25px;
      width: 25px;
      position: absolute;
      border-radius: 50%;
      background-color: #cccccc;
    }

    label:hover input~.select {
      background-color: #ccc;
    }

    label input:checked~.select {
      background-color: #1A33FF;
    }

    .select:after {
      content: "";
      position: absolute;
      display: none;
    }

    label input:checked~.select:after {
      display: block;
    }

    label .select:after {
      top: 9px;
      left: 9px;
      width: 8px;
      height: 8px;
      border-radius: 50%;
      background: white;
    }
  </style>
</head>

<body>

  <div class="container mt-5">
    <form action="" method="post" class="mb-3">
      <label>
        <input type="radio" name="radio" value="Lock & Key">Lock & Key
        <span class="select"></span>
      </label>
      <label>
        <input type="radio" name="radio" value="Umbrella Academy">Umbrella Academy
        <span class="select"></span>
      </label>
      <label>
        <input type="radio" name="radio" value="Stranger Things">Stranger Things
        <span class="select"></span>
      </label>
      <label>
        <input type="radio" name="radio" value="Ozark">Ozark
        <span class="select"></span>
      </label>

      <input type="submit" name="submit" vlaue="Get Values">
    </form>

    <?php
      if(isset($_POST['submit'])){
        if(!empty($_POST['radio'])) {
          echo '  ' . $_POST['radio'];
        } else {
          echo 'Please select the value.';
        }
      }
    ?>
  </div>

</body>

</html>
Conclusion
Finally, Radio Buttons in the PHP tutorial is over. In this tutorial, we learned how to retrieve the selected radio button value and how to add the custom styling in radio buttons using only CSS.