Laravel login with Github tutorial; this step-by-step guide explains how to integrate OAuth Github login in the laravel app with the help of a third-party composer socialite package from scratch.
Social login makes the authentication process facile; social platforms, be it Facebook, Twitter, Google, LinkedIn, are the most common and notable tools which establish the people connection quickly.
This guide helps you learn Github login integration or implementation easily using the laravel socialite library.
This laravel socialite GitHub login implementation tutorial example is not possible without the Laravel socialite package.
It offers an intuitive, graceful mechanism for OAuth authentication not just with Github but also for Facebook, Twitter, Google, LinkedIn, GitHub, GitLab, and Bitbucket.
Laravel 10 OAuth Login with Github Example
- Step 1: Create Laravel App
- Step 2: Add Database Details in ENV
- Step 3: Add Jetstream in Laravel
- Step 4: Install and Setting Up Socialite Package
- Step 5: Add Github ID in Users Table
- Step 6: Register Github Client ID and Secret
- Step 7: Construct Controller
- Step 8: Create Routes
- Step 9: Update Login View
- Step 10: Start Laravel App
Create Laravel App
Invoke the very first to create a new laravel app, make sure you have composer configured on your system:
composer create-project laravel/laravel --prefer-dist laravel-github-login-exampleAdd Database Details in ENV
Secondly, open .env configuration file and add your database credentials:
DB_CONNECTION=mysql
DB_HOST=127.0.0.1
DB_PORT=3306
DB_DATABASE=db_name
DB_USERNAME=root
DB_PASSWORD=
If you are using MAMP local server in macOs; make sure to append UNIX_SOCKET and DB_SOCKET below database credentials in .env file.
UNIX_SOCKET=/Applications/MAMP/tmp/mysql/mysql.sock
DB_SOCKET=/Applications/MAMP/tmp/mysql/mysql.sock
Add Jetstream in Laravel
Laravel Jetstream is a quintessential authentication scaffolding crafted with Tailwind CSS and allows you to build auth templates with Livewire or Inertia scaffolding effortlessly.
It gives you pre-defined login, registration, email verification, two-factor authentication, session management, API support templates.
You can easily install jetstream package with suggested command:
composer require laravel/jetstreamNext, use command to create auth templates:
php artisan jetstream:install livewireSubsequently, install needed dependencies:
npm installExecute command to compile scripts:
npm run devEventually run migration with recommended command:
php artisan migrateInstall and Setting Up Socialite Package
In this step, you will install socialite library in laravel using the provided command:
composer require laravel/socialiteGet inside the config/app.php file then add socialite services in providers, as well as aliases arrays:
....
....
'providers' => [
    ....
    ....
    Laravel\Socialite\SocialiteServiceProvider::class,
],

'aliases' => [
    ....
    ....
    'Socialite' => Laravel\Socialite\Facades\Socialite::class,
],
....
....
Add Github ID in Users Table
In the next imperative task, we have to add the new value inside the users’ table, hence use the command to create a new migration file:
php artisan make:migration add_github_social_id_fieldAfter that, head over to the database/migration/xxx_add_github_social_id_field.php file, update the suggested values in the newly generated migration file.
<?php

use Illuminate\Database\Migrations\Migration;
use Illuminate\Database\Schema\Blueprint;
use Illuminate\Support\Facades\Schema;

class AddGithubSocialIdField extends Migration
{
    /**
     * Run the migrations.
     *
     * @return void
     */
    public function up()
    {
        Schema::table('users', function ($table) {
            $table->string('github_id')->nullable();
            $table->string('auth_type')->nullable();
        });
    }

    /**
     * Reverse the migrations.
     *
     * @return void
     */
    public function down()
    {
        Schema::table('users', function ($table) {
            $table->dropColumn('github_id');
           $table->dropColumn('auth_type');
         });
    }
}
Now, we have to register the newly created migration file’s value inside the User model file. Consequently, head over to the app/Models/User.php file and update the values.
<?php
namespace App\Models;
use Illuminate\Contracts\Auth\MustVerifyEmail;
use Illuminate\Database\Eloquent\Factories\HasFactory;
use Illuminate\Foundation\Auth\User as Authenticatable;
use Illuminate\Notifications\Notifiable;

use Laravel\Fortify\TwoFactorAuthenticatable;
use Laravel\Jetstream\HasProfilePhoto;
use Laravel\Sanctum\HasApiTokens;

class User extends Authenticatable
{
    use HasFactory, Notifiable;

    /**
     * The attributes that are mass assignable.
     *
     * @var array
     */
    protected $fillable = [
        'name',
        'email',
        'password',
        'github_id',
        'auth_type',
    ];

    /**
     * The attributes that should be hidden for arrays.
     *
     * @var array
     */
    protected $hidden = [
        'password',
        'remember_token',
    ];

    /**
     * The attributes that should be cast to native types.
     *
     * @var array
     */
    protected $casts = [
        'email_verified_at' => 'datetime',
    ];
}
Now new table values have been added, just open the console and execute the command to run migration and update the database tables:
php artisan migrateRegister Github Client ID and Secret
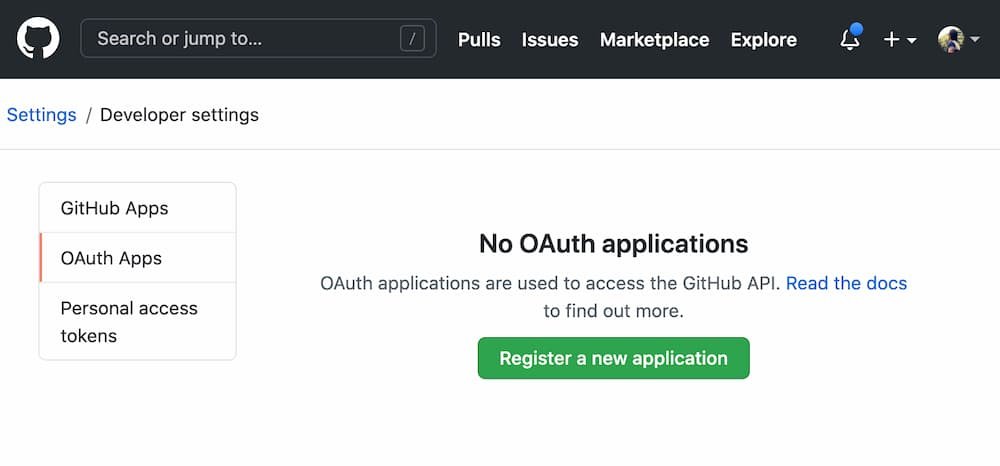
In order to get along with this tutorial, you must have a Github account.
When you create the account, you have to visit the GitHub developers account to get the Github client id and secret.
You have to create a new OAuth application, so create on Register a new application button.
When you react to the next screen, fill in the required information to register a new OAuth app.

Once the app is registered correctly, then you can get the Client ID and Secrets effortlessly.
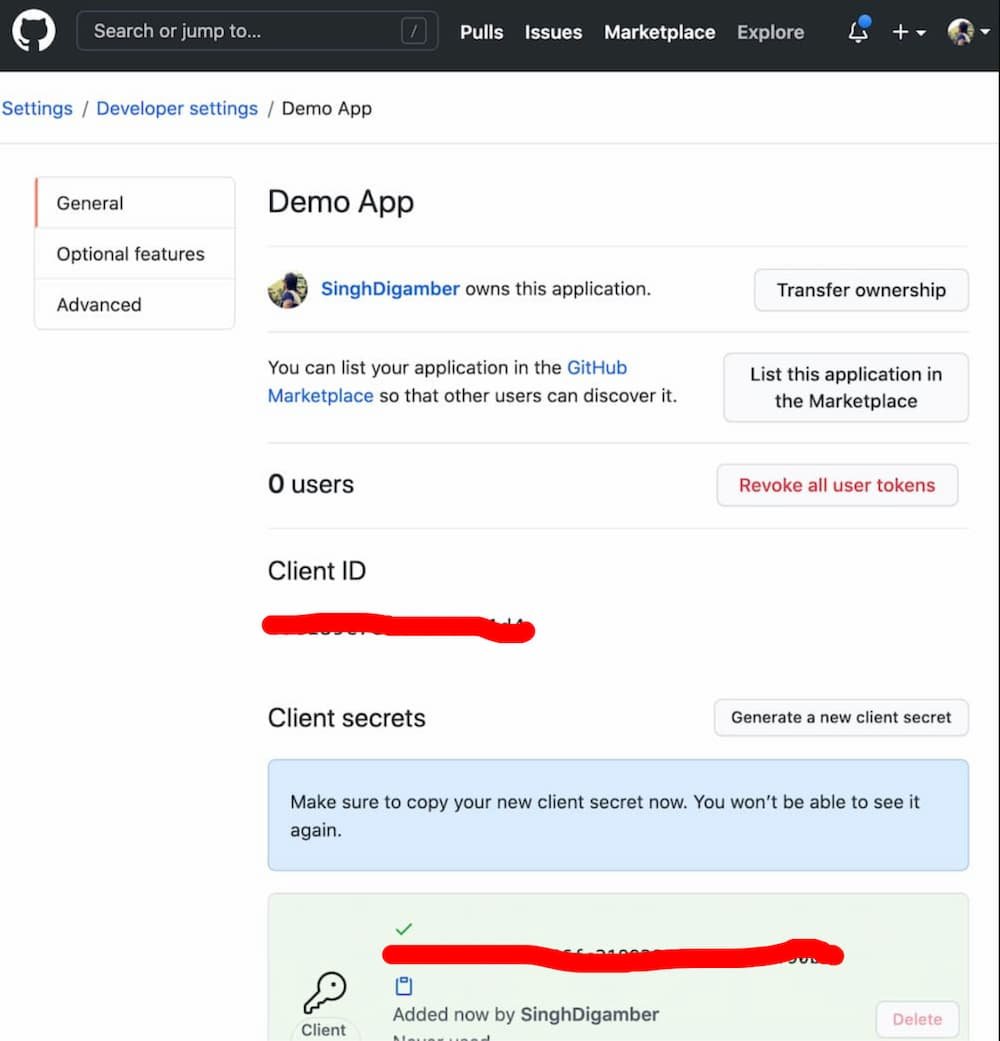
We have got the GitHub id and secret keys; thereupon, we have to make the consensus between laravel and GitHub. Further, register id and secret keys in the config/services.php file as suggested below:
return [
    ...
    ...

    'github' => [
        'client_id' => 'xxxxx',
        'client_secret' => 'xxxxx',
        'redirect' => 'http://127.0.0.1:8000/auth/github/callback',
    ],
]
Construct Controller
In this step, you have to create a controller, and it will be the locus of the Laravel GitHub Login integration example.
php artisan make:controller GitHubController
Next, head over to app/Http/Controllers/GitHubController.php and recklessly update the provided code:
<?php
namespace App\Http\Controllers;

use Illuminate\Http\Request;

use Auth;
use Exception;
use Socialite;
use App\Models\User;

class GitHubController extends Controller
{

    public function gitRedirect()
    {
        return Socialite::driver('github')->redirect();
    }


    public function gitCallback()
    {
        try {

            $user = Socialite::driver('github')->user();

            $searchUser = User::where('github_id', $user->id)->first();

            if($searchUser){

                Auth::login($searchUser);

                return redirect('/dashboard');

            }else{
                $gitUser = User::create([
                    'name' => $user->name,
                    'email' => $user->email,
                    'github_id'=> $user->id,
                    'auth_type'=> 'github',
                    'password' => encrypt('gitpwd059')
                ]);

                Auth::login($gitUser);

                return redirect('/dashboard');
            }

        } catch (Exception $e) {
            dd($e->getMessage());
        }
    }
}
Create Routes
In this step, we create two routes to handle the login with GitHub in laravel. Hence, add the following code in routes/web.php file:
<?php

use Illuminate\Support\Facades\Route;
use App\Http\Controllers\GitHubController;

/*
|--------------------------------------------------------------------------
| Web Routes
|--------------------------------------------------------------------------
*/

Route::get('auth/github', [GitHubController::class, 'gitRedirect']);
Route::get('auth/github/callback', [GitHubController::class, 'gitCallback']);
Integrate Socialite Github Login
We have covered almost everything; in the subsequent step, we will open the views/auth/login.blade.php file, and add the Github login button in the login template and bind the route which requests Github OAuth login in laravel.
<x-guest-layout>
    <x-jet-authentication-card>
        <x-slot name="logo">
            <x-jet-authentication-card-logo />
        </x-slot>

        <x-jet-validation-errors class="mb-4" />

        @if (session('status'))
        <div class="mb-4 font-medium text-sm text-green-600">
            {{ session('status') }}
        </div>
        @endif

        <form method="POST" action="{{ route('login') }}">
            @csrf

            <div>
                <x-jet-label value="{{ __('Email') }}" />
                <x-jet-input class="block mt-1 w-full" type="email" name="email" :value="old('email')" required
                    autofocus />
            </div>

            <div class="mt-4">
                <x-jet-label value="{{ __('Password') }}" />
                <x-jet-input class="block mt-1 w-full" type="password" name="password" required
                    autocomplete="current-password" />
            </div>

            <div class="block mt-4">
                <label class="flex items-center">
                    <input type="checkbox" class="form-checkbox" name="remember">
                    <span class="ml-2 text-sm text-gray-600">{{ __('Remember me') }}</span>
                </label>
            </div>

            <div class="flex items-center justify-end mt-4">
                @if (Route::has('password.request'))
                <a class="underline text-sm text-gray-600 hover:text-gray-900" href="{{ route('password.request') }}">
                    {{ __('Forgot your password?') }}
                </a>
                @endif

                <x-jet-button class="ml-4">
                    {{ __('Login') }}
                </x-jet-button>
            </div>


            {{-- Login with GitHub --}}
            <div class="flex items-center justify-end mt-4">
                <a class="btn" href="{{ url('auth/github') }}"
                    style="background: #313131; color: #ffffff; padding: 10px; width: 100%; text-align: center; display: block; border-radius:3px;">
                    Login with GitHub
                </a>
            </div>
        </form>
    </x-jet-authentication-card>
</x-guest-layout>
Start Laravel App
In the final step, run the command to start the laravel social login project.
php artisan serveYou can login with GitHub using the below url:
http://127.0.0.1:8000/login
Conclusion
We have successfully completed the laravel social login tutorial; in this tutorial, we learned how to integrate Github login in the laravel application using the laravel socialite package.
Moreover, we used the JetStream package in laravel to create the flawless authentication UI templates.