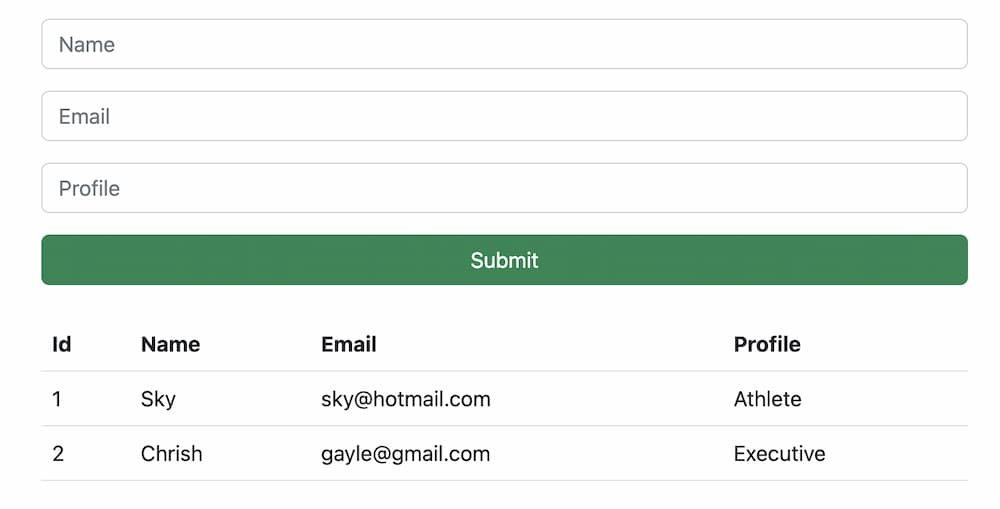
In this article, you will learn how to add form data values by clicking on submit button in an HTML table component in React JS application.
We will use the bootstrap module, React hooks, and functional components to create as well as dynamically pass values from the Form component to the Table components.
A table displays data in a grid and organizes data in columns and rows.
It allows us to conjugate data that is too complex or difficult to be depicted adequately in the text, letting the reader to view the results swiftly.
We will use the HTML table to collect the data as props or that we send from the form component in React.
You will also learn how to use access props object in a function component in React table component.
React permits us to send information from one component to another using props, aka properties. Props are objects generally used inside a component.
We will use props to add a new data row to the table. We will profoundly check how to pass and access props.
Props are defined using an HTML tag; in a later section of this guide, you will see that.
Setting Up React Project
The first thing is to set up a new React project.
First, make sure to add Node and Npm on your machine, then go ahead and execute the provided command to create the new project.
npx create-react-app react-blogOnce the app is created, next step is to move into the app directory.
cd react-blogAdd Bootstrap Library
Bootstrap is the quite famous CSS Framework for creating mobile-first responsive applications.
You have to run the given command to install the Bootstrap module in React using npm.
npm i bootstrap --legacy-peer-depsIn order to use Bootstrap in React, you have to add the bootstrap CSS path into the App.js component file.
import "../node_modules/bootstrap/dist/css/bootstrap.min.css";Create Table Component
You have to create the components/ folder in the src/ directory.
After that, create the Table.js file; here, in this file you have to add the following code.
It will create the table component that receives the data through a props property we named it tableData.
function Table({ tableData }) {
  return (
    <table className="table">
      <thead>
        <tr>
          <th>Id</th>
          <th>Name</th>
          <th>Email</th>
          <th>Profile</th>
        </tr>
      </thead>
      <tbody>
        {tableData.map((data, index) => {
          return (
            <tr key={index}>
              <td>{index + 1}</td>
              <td>{data.name}</td>
              <td>{data.email}</td>
              <td>{data.profile}</td>
            </tr>
          );
        })}
      </tbody>
    </table>
  );
}

export default Table;
Create Form Component
In the earlier step, we formed the table component. Now, we need a form component that sends the data to table component.
Therefore, make the another file with Form.js in the components/ folder.
We created a primary function and named it Form, to pass the form data to the table, we declared three props and set the form inputs (name, email, profile).
function Form({ onValChange, formObject, onFormSubmit }) {
  return (
    <div className="row mb-4">
      <div className="mb-3">
        <input
          type="text"
          className="form-control"
          placeholder="Name"
          onChange={onValChange}
          value={formObject.name}
          name="name"
        />
      </div>
      <div className="mb-3">
        <input
          type="email"
          className="form-control"
          placeholder="Email"
          onChange={onValChange}
          value={formObject.email}
          name="email"
        />
      </div>
      <div className="mb-3">
        <input
          type="text"
          className="form-control"
          placeholder="Profile"
          onChange={onValChange}
          value={formObject.profile}
          name="profile"
        />
      </div>

      <div className="d-grid">
        <input
          type="submit"
          onClick={onFormSubmit}
          className="btn btn-success"
        />
      </div>
    </div>
  );
}

export default Form;
Insert Form Values in Table
Next, we are going to create the Profile.js file in the components folder, add the given code into the file.
Make sure to import table and form components, and create the functions that add the code to the table.
import React, { useState, Fragment } from "react";
import Form from "./Form";
import Table from "./Table";

function Profile() {
  const [tableData, setTableData] = useState([]);
  const [formObject, setFormObject] = useState({
    name: "",
    email: "",
    profile: "",
  });

  const onValChange = (event) => {
    const value = (res) => ({
      ...res,
      [event.target.name]: event.target.value,
    });
    setFormObject(value);
  };

  const onFormSubmit = (event) => {
    event.preventDefault();
    const checkVal = !Object.values(formObject).every((res) => res === "");
    if (checkVal) {
      const dataObj = (data) => [...data, formObject];
      setTableData(dataObj);
      const isEmpty = { name: "", email: "", profile: "" };
      setFormObject(isEmpty);
    }
  };
  return (
    <Fragment>
      <Form
        onValChange={onValChange}
        formObject={formObject}
        onFormSubmit={onFormSubmit}
      />

      <Table tableData={tableData} />
    </Fragment>
  );
}

export default Profile;
Register Component in App
Open the App.js file, in this file you have to add the bootstrap, and profile components as given below.
import React from "react";
import "../node_modules/bootstrap/dist/css/bootstrap.min.css";
import "./App.css";
import Profile from "./components/Profile";

function App() {
  return (
    <div className="container mt-5">
      <h2>React Add Form Data to Table Component Example</h2>
      <Profile />
    </div>
  );
}

export default App;
View App on Browser
Finally, we need to run the given command to start the server and view the application on the browser.
npm startAfter running the react server, make sure to run the given url.
Conclusion
In this comprehensive tutorial, we have covered how to add form data to the table component using props, function components, and React hooks.
We also learned how to use bootstrap 5 to design form and table components within minutes.